Hello everyone. Welcome to FTT blog. Today we will learn about the main things of creating a website systematically. If you follow this tutorial closely, then I hope that you will be able to create a website easily using WordPress CMS. First, we need a domain and hosting to create a website. Domain is a particular URL (Uniform Resource Locator) which specifies a particular webpage or a particular IP (Internet Protocol). It is hard to remember IP, so we do identify a URL by name.
Now, there is a question. How will you take a domain?
It is very easy. I am giving some of the top domain providers company's website address here. If you want, then you can take your domain from here.
GoDaddy.
Namecheap.
Namesilo.
Beside them, there are many websites, who provide the facilities. You can pick domain by your MasterCard or Paypal from these websites.
If you do not have any MasterCard, then you can see this article: Full image tutorial of getting MasterCard free.
Here, I am showing the process of taking the domain from Namecheap through the images below.
First, click on the 'SIGN UP' button and give your required information.
Once you have created your account, you can register a domain.
As shown in the picture below, give your desired domain name and search to see whether your domain is free or not. If the domain is free, then you can pick it.
The construction works of your site will start after getting the preferred domain.
As shown in the picture, click the 'Cart' and 'View Cart' button.
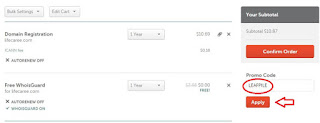
You can also reduce the price of the domain by using the promo code. You can easily get this promo code by searching on Google. From there, you should mention that how many years you want to keep that domain and according to that, they will show the value of your domain.
I think you have noticed that the value of the domain has decreased because of giving the promo code. Confirm your domain by clicking the 'Confirm Order' button.
Now, you need the hosting space for your domain. Here, I am showing the process of taking hosting from Namecheap. As before, login to your Namecheap account and click the 'Shared Hosting' from Hosting.
Now, you can take your desired plan. Here, I am assuming that you are taking the 'Value' plan and click 'Add to Cart'.
Now, you need to choose an option. If you want to get hosting for the domain that you purchased a little earlier, then click the third option (Use a domain I own with Namecheap). If your domain is taken from another company, then click the last option (Use a domain I own from another register) and click 'Continue'.
Now, you have to enter your domain name there (only root domain) and click 'Use this Domain' and 'Continue' button.
If you have a promo code, then give that there and click 'Confirm Order'. Then take your hosting by giving your payment method information.
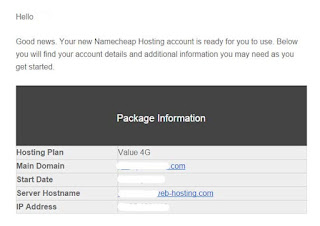
Now, you can check your e-mail and notice that all the information is given there. You will get your hosting panel access from there.
Since your domain and hosting are taken from the same register, so there is nothing about domain and hosting merging but if your domain and hosting are taken from two different register, then you will need to merge the two. Look at the bottom of the e-mail received from your hosting and you will find a part named Nameservers, where you are given two Nameserver.
Now, go to your domain control panel and go to the DNS. Go there, paste your two Nameserver and come out after saving that. Then your domain will be merged with your hosting.
WordPress installation on the website
Now, you should install WordPress on your website and for that, login to your hosting cPanel.
Login to the cPanel with your username and password.
Then add your domain. Go to the domain option of the cPanel. Click 'Addon Domains' and give your required information.
You need to add your root domain and password there. Click 'Add Domain'.
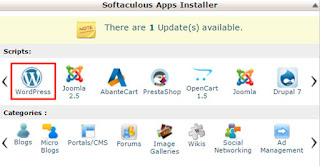
Now, go to Softaculous and click 'WordPress'.
Then click 'Install'.
After clicking the 'Install' button, this page will appear.
First, you have to select protocol. There, if you select http://www., then your website address will be http://www.yourwebsite.com. Again, if you select just http://, then your website address will be http://yourwebsite.com
Select your root domain in the 'Choose Domain' option. Give your website name and description in the 'Site Settings' option.
Give your WordPress 'Admin Username' and 'Admin Password' in the 'Admin Account' option. You will login to your WordPress account with that username and password. If you want, then you can give the Admin email there.
Now, under the 'Advanced Options', you need to name your WordPress database and table prefix. In this case, WordPress itself suggests names. You can also change that name and you can give your own WordPress database name and table prefix.
If you want that your WordPress will update itself automatically, then mark the 'Auto Upgrade' box and if you want that your WordPress Plugins will be updated automatically, then mark the below box also.
Using the 'Automatic Backup' option, you can create a Backup of your website. In the photo, I have kept Backup of every week and it will update overwriting the old data automatically after 4 times. Finally, click the 'Install'.
Once it is installed correctly, you will be informed by a message. You will see your WP Login URL of your WordPress there.
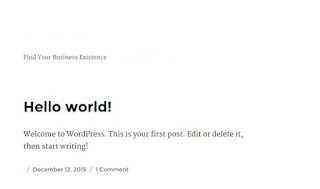
You will see your website there and WordPress is installed correctly. Now, you can go to your website by clicking your website URL.
You will find your homepage like this. Login to your WordPress from there.
There you can see the WordPress Dashboard and you will have to manage all the activities from there.
This is it for today. If you can learn this work well, then you can do a good amount of work of WordPress Installation, which are available in the freelance market places. In addition, many people are earning good by their work of just 'WordPress Installation' in the service-oriented marketplaces like 'Fiverr'.
Watch the photo. 93 people have taken this gig of Fiverr. So, if you want, then you can earn by creating this kind of gigs.
If you Like our post, then do not forget
to share. Cheers everybody.
Join me in Facebook.
Like our official Facebook page.
Join me in Google+.
Follow us on Pinterest.
Follow us on Twitter.
Join me in Facebook.
Like our official Facebook page.
Join me in Google+.
Follow us on Pinterest.
Follow us on Twitter.


No comments :
Post a Comment